Thursday, September 24, 2015

Happy Fall Y'all!

    I love fall and all it brings... back to school, football, leaves changing, weather cooler (though we haven't seen that yet here) and Thanksgiving.  So welcome to our September "Scrapping our Stash" blog hop where you'll find a bit of everything.  You should have arrived here from Katrina but if not, the whole list is posted at the end.
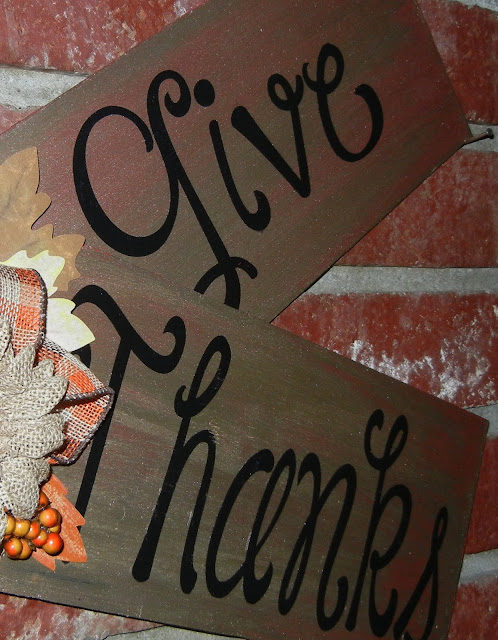
    I chose to alter a couple pieces I had, an old wreath and some stenciled planks.  Yea!  some new decorations for our home.


I picked these up last year and love the light gold wash on them, with a bit of the red base showing through.  The flip side says "Merry Christmas" in red and black.  The lettering was stenciled. 

Here's a close up of the bow. The burlap ribbon was an end of season purchase last year from Hobby Lobby.  The burlap flower was from there as well, the other stems, pumpkin and berries are from my stash.  I used my Cricut "Fall and Winter" cartridge to cut the leaves and enhanced them using chalk pastels.
 So happy with the final product. Simple yet festive.


I had a fall wreath that had seen it's better days so I stripped all the decorations off and started over. I first covered the entire wreath with orange burlap as a base.  Then I use 2 in width natural burlap and made half bows, attached with floral u-pins. A few flowers from the stash and a nice walk to gather various dried seed pods which I cleaned and then sprayed with a matte finish lacquer.  A small sign done on black card stock with chalk writing.
A couple more floral pieces - the pear and some berries.  Not a lot of paper here, but nice to reuse and upscale some craft supplies.

Here's our hop list

Lovely Suzanna is next with a great layout.  Thanks for stopping by and may your days be filled with "Autumn Blessings". Cheryl

Thursday, August 27, 2015

Back to (Bible) School

Welcome to Scrapping our Stash
I'm back after a couple of very busy months and so glad you stopped by. You should have arrived here from Alison's blog. The complete list is below.

For the kids, it's back to school time.  It is for me as well. After 3 months off, Bible Study Fellowship is ready to begin again and I must prepare my seminars and the materials to publicize them.  

I began with a basic black foam board and using chalk pastels - created my basic chalkboard.  Because there is a new seminar every 2-3 weeks, I need to be able to change it out without recreating it every time... and so came
THE BANNERS!
I created banners with each title and and second one with the date and they will hang over the general information board.

While I got the foam board specifically for this project, everything else was definitely from the stash... and specifically the scrap bin.
I wanted the banner to be made of various papers and this was the perfect solution.  The letters are cut from the Cricut Lyrical Letters cartridge.

If you're goal is to use up your stash, well, you don't put the leftovers back in but you use them up.

... and make a couple of cards!  
Letters from Miss Elizabeth... yeah, stash so old I glued them on (and tossed the rest! but they were the right size ;-))
Add a few buttons, some baker's twine and a nice, general card to cheer someone.
The second card got a little washi tape, more of those infamous, old letters stickers and twine and another card to make someone smile.

Thanks for joining us on the hop.You'll hop over and see Wendi next but the whole list is here in case you missed someone!


Thursday, May 28, 2015

Graduation Day - It's Party Time!

                           Welcome to SCRAPPING OUR STASH monthly blog hop. 
You should have arrived here from Suzanna's  Blog and her extraordinary layout. What a talent!

Last month I gave you a preview of decorations I was making for a friend's graduation party for her children.  Well, the day has come and gone and it was a great day.  I have layouts and altered items, party decorations and mementos to share. Much longer than my usual post, but full of fun and memories and the ideas can be changed up to fit your celebration... whatever it may be!


As you walked up, you were greet by a sign so that you knew you were at the right house.

The pieces were actually left over foam board from the "letters" (to come)... seemed a shame to waste!  Letters and Stars were cut on my very old (30 years old but still very usable) Ellison Die Cut machine... its usability attests to physical, manual die cutters vrs. computers. I chose to use this because of the number of cuts I would be making - these plus the 3 banners and attribute poles - all needed 6 inch letters. It was both faster and economical as it didn't wear out any blades or mats - and gave my arms some much needed exercise!


Then we headed into party central, the patio and back yard. We were blessed with beautiful weather (it really "never rains in Southern California" ).  First - the attribute pole - 4  chosen for they are both desired attributes and those already developing in the grads.


These again used the Ellison die cuts and were accented by Cricut cuts (yes, I do love and use my Cricut a lot!) Cartridges are listed in the final part of the post.

The back wall of the patio held the large banner, 2 smaller ones were outside. You see the gift table on the right.  Here's a close up.


The balloon display on the right was formed from their soccer picture folders (floral foam in center).  The 2 framed pictures were gifts from their parents. The flowers - aren't they fun? They're from Michaels!

The frames are 11x14 so I had to piece together 2 sheets of 12 inch paper.
Paper and Stickers were from Paper House - Live by Faith collection.


Used a little velum for the cross and a metal flower (stash - sorry no manufacturer)
The copper stars are cut from DCWV shimmer paper. "God's love" sticker is by Paper Studio.


Here are the "letters" I spoke of earlier. Cut from foam board, they are a collage of current pictures. They were mounted on side windows.


Onto the outside.


The singing boards, with instructions. Very simple with Forever in Time Washi tape used as the border, Recollections Paper black and white line for mount/frame.


I made the tri-fold board below out of foam board to get it to the size I wanted. You can see that some of the mountings are 12x12 and ready to slip into the scrapbook. I'll remove the others and remount as well.


Again, the background paper is wrapping paper. Pattern paper is from Recollection.
Slide on down to the next entry to see the centerpieces and blog listing. (It wasn't cooperating so there are 2 entries... ever have one of "those" days?)  Even on a trying day, I remember the verse, dear to my heart and chosen by their parents for them.... "I know the plans I have for you, declares the Lord. Plans to prosper and not to harm you, plans to give you a hope and a future." Jeremiah 29:11
Graduation Day - It's OVER!!!


The Centerpieces featured pictures of the grads at various ages and they were reversible, featuring  Yaya and Tommy on opposite sides. The biggest challenge?  A breezy day and it catching the flags, knocking them over. Yes, they were weighted with rocks but the size of the flags and pix caught the wind and required more than I thought. Thankfully, the wind settled and they were fine.
Flags and pictures were attached to balloon sticks and placed in floral foam, rocks under and over and topped of with Easter grass ( 10 cents/ clearance... wish I could have found more.)

Supplies:
Solid Color papers - Coordinations
Print papers - Recollections (Michaels)
Bags - Michaels
Cans - Trader Joe's Coffee ;-)  covered with wrapping paper from Hobby Lobby
All die cuts are Cricut - Bible verses from "New Testament" cartridge
Other cartridges used were: Phrases, Lyrical Letters, Alphalicious, Plantin Schoolbook, George and Basic Shapes and Sports Mania
Shapes were embossed with Paper Studio star folder (on Cuttlebug machine
White/black "Congrats" and "2015) flags: lessthanperfectlifeofbliss.blogspot.com    (Thanks for the free download).
And then there's Ping Pong Man.   Used a paddle and cut a ball in half, added the mortar board and he's ready to play!

Hope you've enjoyed our graduation day celebration.  Keep "hopping" along - Wendy C is next. 
I have listed the whole blog in case you missed one (that would be sad!)...and comments bring happiness to this scrappy heart!


Thursday, April 23, 2015

Graduation Day

WELCOME TO "SCRAPPING OUR STASH" BLOG HOP

The big day is almost here… high school graduation.  For my friend, she has 2 graduating at the same time so she asked for help decorating and documenting their young lives.  Love her dearly and she is about as opposite from me as you can get soooo no scrapbook and minimal pictures to work from. (You crafters, like me, have a hard time understanding this!) But we can do this. I even got her to help me with some of the tedious adhesive work!  So while the banner pieces are made, they are not yet together as the graduation is still a month off.  TODAY I will show you part of the tri-fold display and 2 of the centerpiece samples so that you can gather ideas and get going on your own projects.

The tri-fold will have Tommy's side and Yaya's side, with family pictures in the center. Because she doesn't have a photo album - yet ;-) - I am placing the pictures on 12x12 pages so they can be removed and put directly into an album. Yes, basically making layouts.  So here's the first one!
What a smile!
The colors are their school colors which makes it much easier than trying to combine their preferences.
Paper - Recollections - Yellow feather and Cut card stock black
Crayon, tack and circle stickers - Miss Elizabeth (yes, that old and used new glue!)
Buttons - Walmart
Washi tape - Framstalla (Ikea)
Glitter stickers - Colorbok
Birght future - Cricut Phrases

Up close
Next I'll show you 2 of the centerpieces. They will be in 1 of 2 styles - tall can or gift bag.
As it will be in the center of the table (thus the title "centerpiece", it needs to be visible from both sides and below is the other side.
Fun on the tables
The container is a coffee bean can from Trader Joes (Columbia Supremo is our preferred blend!).
Cross paper is wrapping paper from Hobby Lobby (about 3 years old) 
Ribbon - Michaels "Craftsmart"
Gold and black papers - Cut Cardstock
Way to go and Congrats - Cricut Lyrical Letters (love this cartridge)
A bright future - Cricut Phrases
Yellow straw - Michael's after Easter clearance


Here's how we will use the gift bag.  Papers are all the same manufacturers.
Love the Lord - Cricut New Testament
Senior and Soccer ball - Cricut  Sports Mania

More next month… til then, Happy Paper Crafting!
Don't forget to stop by all the other blogs or you will miss some amazing projects.  Here's the whole list.

Thursday, March 26, 2015

Easter Cards - Scrapping our Stash

Welcome to "Scrapping our Stash", the monthly blog hop that encourages you to use up what you've got on hand.  You probably have arrived here from my friend Kerri's blog and her beautiful card, but here's the whole list in case you've missed any.

While "hopping" along, I thought you might enjoy a couple of Easter cards.

I would love to tell you where the materials came from, but not only were they from my stash, but most were from my scrap box as well.


The die cut behind the flower is Cricut Storybook cartridge... I split it in half.  I made my own stickers as I couldn't find what I wanted. I used Avery Clear Easy Peel address labels. I get exactly what I want and can pick my own color, size and font.
Your next stop is:
Sandy http://itsafamilyaffairwithscrappynana.blogspot.ca/
You will love her "newborn" layout!


Thursday, February 26, 2015

Friends in the Lord

Welcome to "Scrapping our Stash" blog hop.  Here's the list of all our blogs and I hope that you enjoy and get some inspiration from the wide variety of projects. From cards to layouts to decor, clean and simple to shabby chic, we've got it all for you.
We are blessed with many friends (see note below) but where to hang their pictures. This is now on the hallway wall and a "safe" display. Safe? you ask. Living in earthquake country and having experienced 2, we know pictures fall and we don't want to take the chance of broken glass in our path.
I began by painting the edges and covering it with paper, set slightly askew to give a shadow/outline.
Here's what it looked like before adding some of our friends. Disclaimer: if you are a friend and don't see your picture here, I didn't have a good print and my computer is in the shop so I wasn't able to print any... but soon!

"Friends" was purchased at Hobby Lobby, edges painted and then covered with paper from "Natural Botanicals" by Paper Studio.  The burlap swag is from a 6 inch roll, also from Hobby Lobby.I gathered it a bit, both at the beginning and the end, to give it a swirl effect.

"Lord" was purchased as individual 6 inch letters and covered with paper from the "Natural Botanical" line by Paper Studio. Edges of both Lord and Friends were painted with Ceramcoat Forest Green. "In The" was painted with Apple Barrel brand nutmeg brown and the letters are 1 3/4 inch, made by Memoir Letters.  The little cork butterfly is by Little Yellow Bicycle and doodled on with Sharpie markers.
The flowers are all from Hobby Lobby. The ivory ones are "Spare Parts" by Paper Studio, eggplant and succulents were purchased individually.
Looking down our hall at our blessings... hope your heart and life is filled with them as well.